Prefer not to host it yourself? Our NetLock RMM Cloud offers a secure and hassle-free solution starting at just €60 per month and with no device limitation. Check it out here: NetLock RMM Cloud. Additionally, we provide on-premises installation services for those who prefer that option.
In this guide, we will cover the basic server installation. If you are a larger company, consider opting for the advanced server installation.
The server and web console can be installed either in the cloud or in offline environments, depending on your specific requirements.
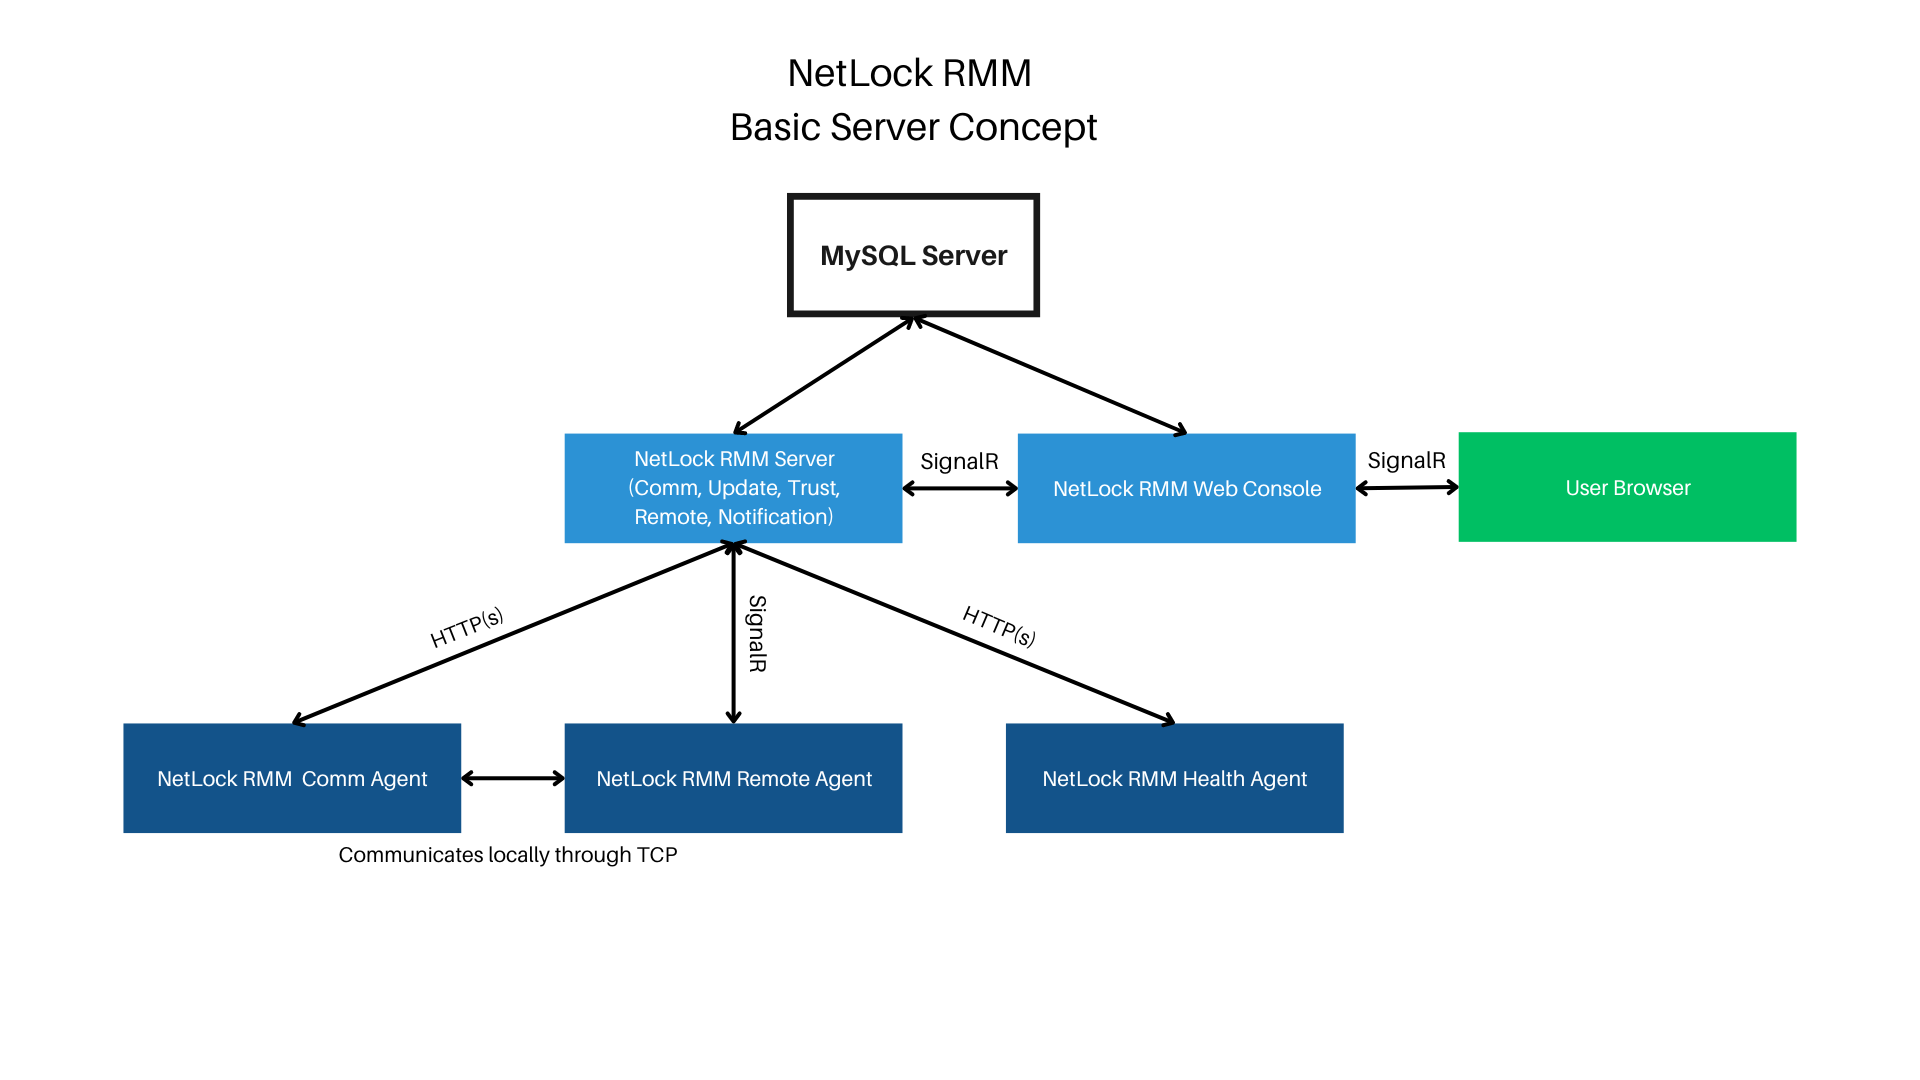
The network structure will be as follows:

The agents only perform outgoing connections, so port forwarding is not required on these machines. The web console renders the content server-sided and then sends it to the user’s browser. Therefore, a permanent connection between the web console and user is necessary for operation. The web console communicates either directly with the SQL server or contacts the NetLock remote server through SignalR in cases like using the remote shell and file browser. Ensure the connection between the web console and NetLock remote server is possible. The web console should only be accessible from trusted environments.
¶ Installation under Windows
¶ Video Tutorial
¶ Obtain the Required Files & Packages
To acquire the installation files for NetLock RMM, you have two primary options:
-
Download Repositories and Compile Binaries: This approach involves manually downloading all necessary repositories, compiling the binaries, and packaging them for use. This method can be time-consuming and require a deeper understanding of the build process. Suits for developers.
-
Use the NetLock RMM Members Portal: This is the recommended method as it allows for quick and free compilation of unsigned packages. The Members Portal simplifies the process, providing an efficient way to obtain the necessary files without the complexity of manual compilation. And yes, if you require code-signed binaries, you can obtain them from the Members Portal as well!
For more information on accessing the features of the Members Portal, check out the official documentation: https://docs.netlockrmm.com/en/members-portal
¶ System Requirements
Refer to supported operating systems: Supported OS/Distributions
- ASP.NET Core 8.0 Runtime (v8.0.7) - Windows Hosting Bundle: Download ASP.NET Core 8.0 Runtime (v8.0.7) - Windows Hosting Bundle Installer (microsoft.com)
- MySQL Server, minimum version 8.0
- SSL certificate (or use the built-in Let’s Encrypt integration to obtain one)
- 2 Cores (may vary depending on the number of agents you monitor)
- 4 GB RAM (may vary depending on the number of agents you monitor)
- SSD recommended
¶ MySQL Server
If you already have a MySQL server prepared, you can skip this step.
- Download the latest MySQL Server: MySQL :: Download MySQL Installer
- Execute the installer and perform the server installation.
- Test the connection with the MySQL client of your choice. Are you on Windows? I recommend HeidiSQL - MariaDB/MySQL, MSSQL, PostgreSQL, SQLite and Interbase/Firebird made easy
- Connected? Then you are ready to continue.
¶ Create MySQL Database
If you don’t already have a Netlock database, follow these steps:
- Connect to your MySQL server.
- Create a new database. For example:
netlock
¶ NetLock RMM Web Console
Instead of compiling all binaries yourself, you can easily obtain them through our Members Portal. We offer free unsigned executables for home labs, as well as digitally code-signed executables for professionals. This option simplifies the setup process and ensures you have the latest and most secure versions of our software. For more details about our Members Portal and the available packages, visit: https://docs.netlockrmm.com/en/members-portal
- Download the packages.zip file from the Members Portal and extract it on your server. Inside, you’ll find the web_console.package. You can extract this package using either 7-Zip or WinRAR, or by renaming the .package extension to .zip and utilizing the built-in Windows zip tool.
- Move the contents of the web_console.package to your desired location on the server.
- Open the
appsettings.jsonfile with a text editor of your choice.
¶ SSL Encryption
We strongly recommend enabling HTTPS. If you enable HTTPS, disable HTTP, enable HTTPS, and set force to true. Also, enable HSTS.
"Kestrel": {
    "Endpoint": {
      "Http": {
        "Enabled": false,
        "Port": 80
      },
      "Https": {
        "Enabled": true,
        "Port": 443,
        "Force": true,
        "Hsts": {
          "Enabled": true
        },
        "Certificate": {
          "Path": "certificates/certificate.pfx",
          "Password": "your-cert-password"
        }
      }
    }
  },
For SSL Encryption, add your own certificate, or use the Let’s Encrypt integration to easily retrieve one.
¶ Using Let’s Encrypt Certificate for SSL
- Go to LettuceEncrypt, enable it, and accept the terms of service.
- Enter the domain names through which the Web Console will be available (separate with commas).
- Set your email address and configure the allowed challenge types. By default, all supported challenges are active.
"LettuceEncrypt": {
    "Enabled": true,
    "AcceptTermsOfService": true,
    "DomainNames": [ "demo.netlockrmm.com" ],
    "EmailAddress": "nico.mak@0x101-cyber-security.de",
    "AllowedChallengeTypes": "Http01, TlsAlpn01, Dns01",
    "CertificateStoredPfxPassword": "Password123"
  },
¶ MySQL Configuration
Configure your MySQL Server. Ensure that the database exists; the Web Console will create the necessary tables itself. If your MySQL server is on the same machine, you may want to add AllowPublicKeyRetrieval=True; to the AdditionalConnectionParameters to prevent connection issues after your system has rebooted.
  "MySQL": {
    "Server": "127.0.0.1",
    "Port": 3306,
    "Database": "netlock",
    "User": "root",
    "Password": "Bochum234",
    "SslMode": "None",
    "AdditionalConnectionParameters": "AllowPublicKeyRetrieval=True;"
  },
¶ Prepare the Connection with the NetLock RMM Remote & File Server
Since the web console communicates with the NetLock RMM Server through SignalR, you need to ensure that the web console can connect to the remote & file server. Set UseSSL to true and change the port to the SSL port if the NetLock RMM Server uses SSL.
 "NetLock_Remote_Server": {
    "Server": "demo.netlockrmm.com",
    "Port": 7433,
    "UseSSL": true
  },
  "NetLock_File_Server": {
    "Server": "demo.netlockrmm.com",
    "Port": 7433,
    "UseSSL": true
  },
¶ Specify your Language Code
The web console currently supports de-DE (German) and en-US (English). In this example, en-US is configured.
  "Webinterface": {
    "Title": "Your company name",
    "Language": "en-US",
    "Membership_Reminder": true,
  }
¶ Members Portal Api
The members portal automatically provides the package URLs and other features to better manage and monitor your NetLock RMM installation. We recommend enabling it. The Cloud variable can be ignored as it is only relevant for instances hosted by our team.
  "Members_Portal_Api": {
    "Enabled": true,
    "Cloud": false
  }
¶ Firewall Configuration
NetLock RMM automatically adds firewall rules to your Windows Firewall based on your configuration. Ensure that port forwarding on your router or firewall is set up correctly. Use tools like telnet to verify that the ports are open.
¶ Starting the Web Console
Run NetLock_Web_Console.exe as an administrator. If everything is configured correctly, the applications console output should look something like this:
Version: 1.0.0.0
Configuration loaded from appsettings.json
Http: False
Http Port: 80
Https: True
Https Port: 443
Https (force): True
Hsts: True
Hsts Max Age: 0
LetsEncrypt: True
Custom Certificate Path:
Custom Certificate Password:
MySQL Server: 127.0.0.1
MySQL Port: 3306
MySQL Database: netlock
MySQL User: root
MySQL Password: Bochum234
MySQL SSL Mode: None
MySQL additional parameters: AllowPublicKeyRetrieval=True;
Microsoft Defender Firewall is enabled.
Executed installation script.
Tables existing.
If issuing the Let’s Encrypt certificate or any other step fails, an error message will appear, and the Web Console window will close. Make sure to capture the content by pressing Ctrl+A and then Ctrl+C to request help. Non-members can request assistance on our Discord server. If you have a membership, it’s best to open a support ticket.
¶ Verify Access to Your Web Console
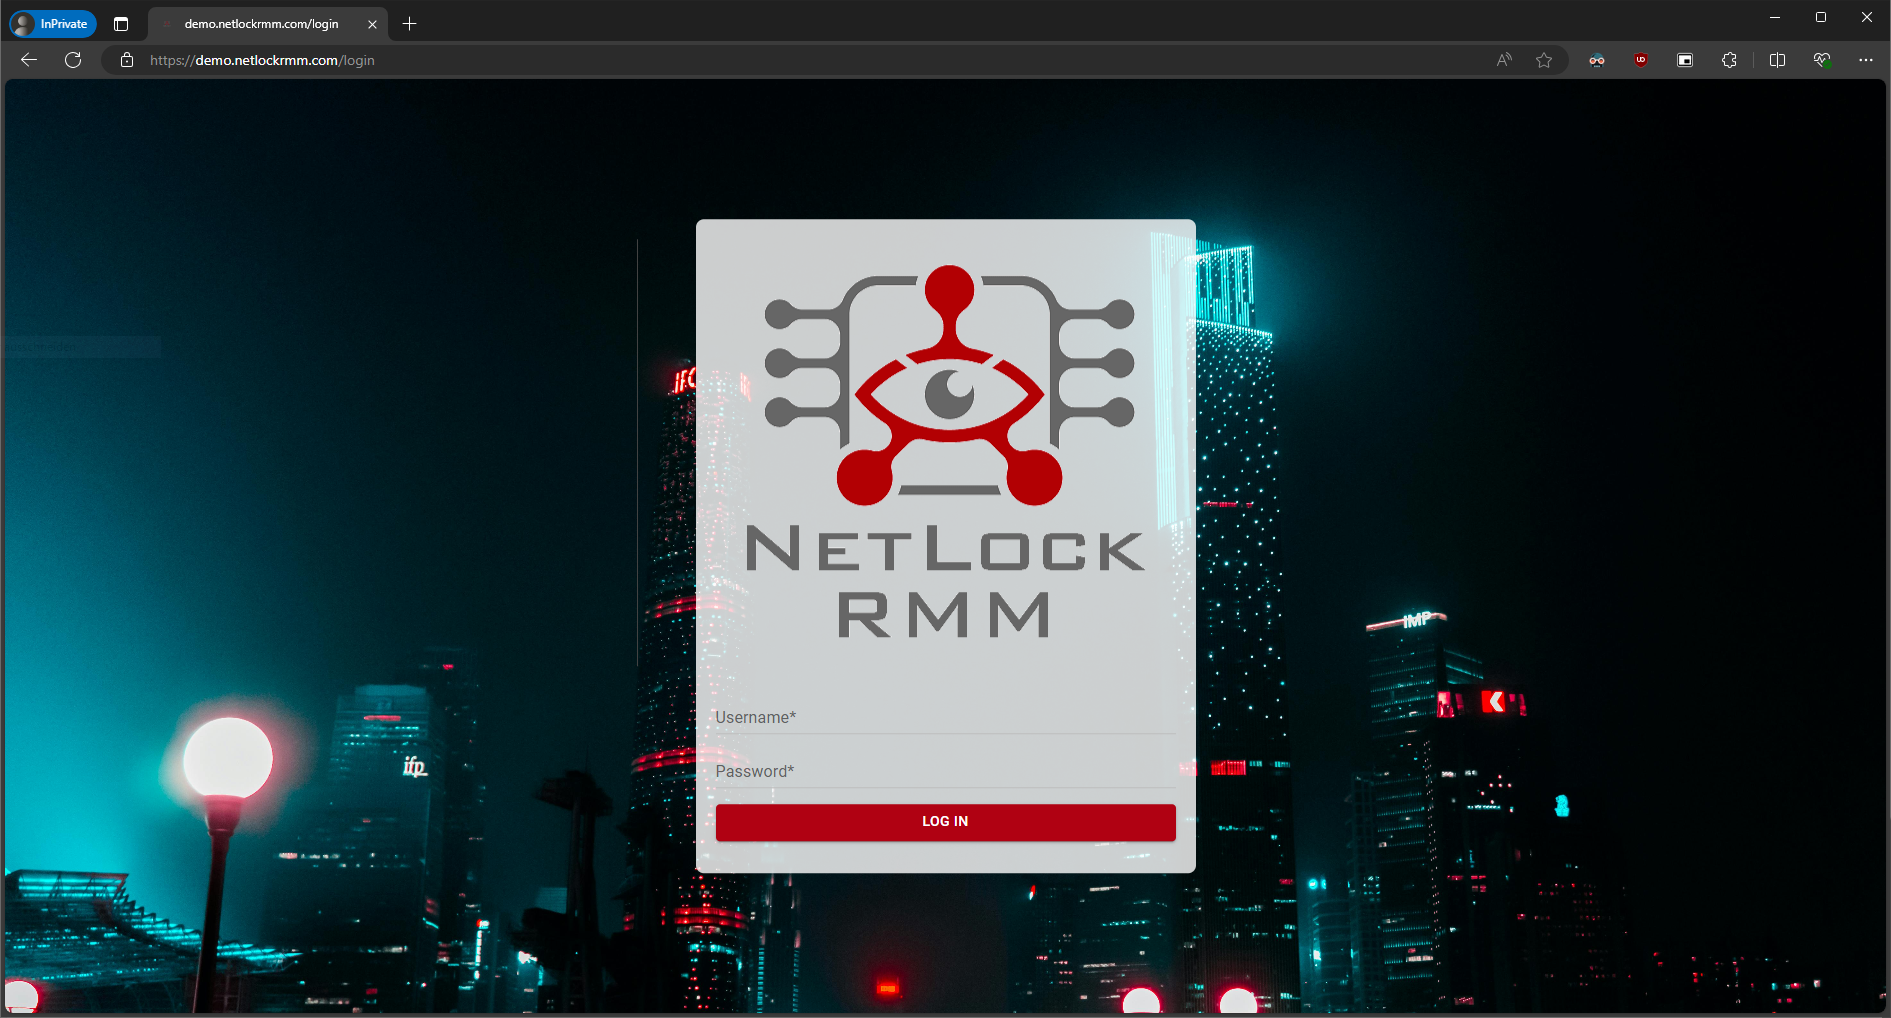
Open your browser and navigate to the Web Console’s IP address, hostname, or domain. You should see the login page that looks something like this:

The default username and password are admin. After logging in, you will be prompted to configure a new password. If you lose your new password for any reason, connect to the database, go to the accounts table, and set reset_password to 1 for the user.
¶ Set the Members Portal Api for the NetLock RMM Server
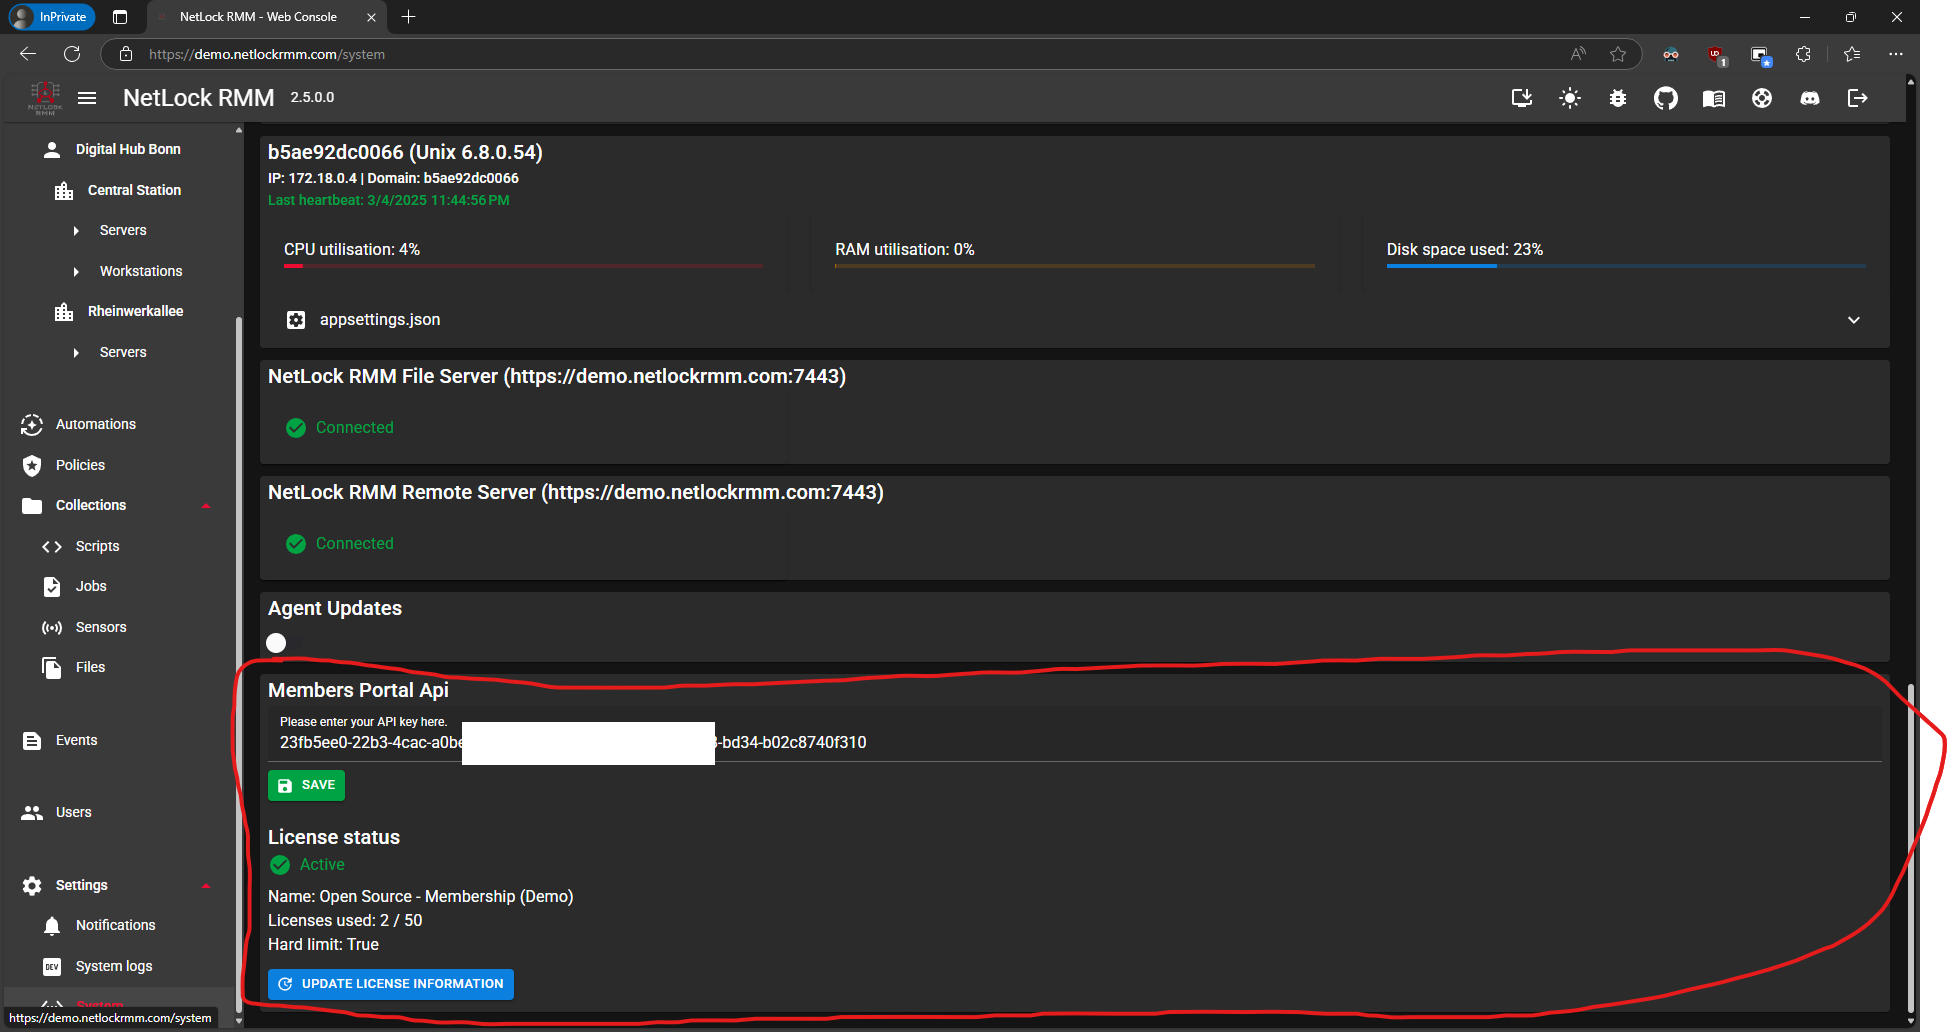
The members portal api key must be set to enable the NetLock RMM server backend to retrieve agent packages. You can either package and deploy these yourself or use the NetLock Members Portal, which is a faster and recommended option. For more details about the free Members Portal, visit: https://docs.netlockrmm.com/en/members-portal
To set the Members Portal Api key, navigate to Settings -> System in the left navigation bar. Scroll down to the bottom of the System settings, where you can enter the Members Portal Api key. This setting ensures your server backend can access the necessary packages for managing and updating the NetLock RMM agents.

¶ Configure the Web Console to Start with Windows via Task Scheduler
- Create a new task.
- Name it
NetLock RMM Web Console. - Select the option to run the task regardless of user login.
- Check “Run with highest privileges”.
- Switch to the “Triggers” tab:
- Select “At startup”.
- Switch to the “Actions” tab:
- Create a new action:
- Click “Browse” and select
NetLock_Web_Console.exe. - In “Start in”, enter the directory path of the executable (this is required; otherwise, you will encounter errors).
- Click “Browse” and select
- Create a new action:
- Switch to the “Conditions” tab and uncheck all boxes.
- Switch to the “Settings” tab and uncheck all boxes.
Done. Test by rebooting your system. You will not see the Web Console process window, but you can verify its operation through Task Manager or by accessing the URL.
¶ NetLock RMM Server
Instead of compiling all binaries yourself, you can easily obtain them through our Members Portal. We offer free unsigned executables for home labs, as well as digitally code-signed executables for professionals. This option simplifies the setup process and ensures you have the latest and most secure versions of our software. For more details about our Members Portal and the available packages, visit: https://docs.netlockrmm.com/en/members-portal
Same procedure.
- Download the packages.zip file from the Members Portal and extract it on your server. Inside, you’ll find the server.package. You can extract this package using either 7-Zip or WinRAR, or by renaming the .package extension to .zip and utilizing the built-in Windows zip tool.
- Move the contents of the server.package to your desired location on the server.
- Open the
appsettings.jsonfile with a text editor of your choice.
¶ SSL Encryption
We strongly recommend enabling HTTPS. If you enable HTTPS, disable HTTP, enable HTTPS, and set force to enabled. Also, enable HSTS.
 "Kestrel": {
    "Endpoint": {
      "Http": {
        "Enabled": false,
        "Port": 7080
      },
      "Https": {
        "Enabled": true,
        "Port": 7443,
        "Force": true,
        "Hsts": {
          "Enabled": true
        },
        "Certificate": {
          "Path": "certificates/certificate.pfx",
          "Password": "your-cert-password"
        }
      }
    },
For SSL encryption, add your own certificate or use the Let’s Encrypt integration to easily obtain one.
¶ Using Let’s Encrypt Certificate for SSL
- Go to LettuceEncrypt, enable it, and accept the terms of service.
- Enter the domain names through which the Web Console will be accessible (separate with commas).
- Set your email address and configure the allowed challenge types. By default, all supported challenges are active.
"LettuceEncrypt": {
    "Enabled": true,
    "AcceptTermsOfService": true,
    "DomainNames": [ "demo.netlockrmm.com" ],
    "EmailAddress": "nico.mak@0x101-cyber-security.de",
    "AllowedChallengeTypes": "Http01, TlsAlpn01, Dns01",
    "CertificateStoredPfxPassword": "Password123"
  },
¶ MySQL Configuration
Configure your MySQL Server. If your MySQL server is on the same machine, you may want to add AllowPublicKeyRetrieval=True; to the AdditionalConnectionParameters to prevent connection issues after your system reboots.
  "MySQL": {
    "Server": "127.0.0.1",
    "Port": 3306,
    "Database": "netlock",
    "User": "root",
    "Password": "Bochum234",
    "SslMode": "None",
    "AdditionalConnectionParameters": "AllowPublicKeyRetrieval=True;"
  },
¶ Roles
Since the basic server installation covers only one server, ensure that all server roles are set to true.
    "Roles": {
      "Comm": true,
      "Update": true,
      "Trust": true,
      "Remote": true,
      "Notification": true,
      "File": true,
      "LLM": true
    }
¶ Members Portal Api
The members portal automatically provides the package URLs and other features to better manage and monitor your NetLock RMM installation. We recommend enabling it.
  "Members_Portal_Api": {
    "Enabled": true
  }
¶ Firewall Configuration
NetLock RMM automatically adds firewall rules to your Windows Firewall based on your configuration. Ensure that port forwarding on your router or firewall is correctly set up. Use tools like telnet to verify that the ports are open.
¶ Starting the Server
Run NetLock_RMM_Server.exe as an administrator. If everything is configured correctly, it’s application console output should look something like this:
Version: 1.0.0.0
Configuration loaded from appsettings.json
Http: False
Http Port: 80
Https: True
Https Port: 443
Https (force): True
Hsts: True
Hsts Max Age: 0
LetsEncrypt: True
Custom Certificate Path:
Custom Certificate Password:
MySQL Server: 127.0.0.1
MySQL Port: 3306
MySQL Database: netlock
MySQL User: root
MySQL Password: Bochum234
MySQL SSL Mode: None
MySQL additional parameters: AllowPublicKeyRetrieval=True;
Microsoft Defender Firewall is enabled.
If issuing the Let’s Encrypt certificate or any other step fails, an error message will appear, and the servers window will close. Make sure to capture the content by pressing Ctrl+A and then Ctrl+C to request help. Non-members can request assistance on our Discord server. If you have a membership, it’s best to open a support ticket.
That’s it. You are ready to go. Now you might want to add your first tenant.
¶ Configure the Server Start with Windows via Task Scheduler
- Create a new task.
- Name it
NetLock RMM Server. - Select the option to run the task regardless of user login.
- Check “Run with highest privileges”.
- Switch to the “Triggers” tab:
- Select “At startup”.
- Switch to the “Actions” tab:
- Create a new action:
- Click “Browse” and select
NetLock_RMM_Server.exe. - In “Start in”, enter the directory path of the executable (this is required; otherwise, you will encounter errors).
- Click “Browse” and select
- Create a new action:
- Switch to the “Conditions” tab and uncheck all boxes.
- Switch to the “Settings” tab and uncheck all boxes.
Everything is now set up! If you encounter any issues, feel free to ask for help on Discord. If you have a membership, we’re happy to assist remotely as well—just get in touch with us.